Go to Configuration --> Integration
This is where the Integrations features are set up and maintained. Key CRM building features can be activated.
The following are features which are integral to building a successful CRM program.

Ecwid
Go to Configuration --> Integration --> Ecwid
To integrate an eCommerce site with your retailcloud account you have a number of options:
1) Use our direct integration and have your eCommerce site linked to our store inventory so you always know availability.
Advantages:
-
Easy of implementation
-
Direct tie on with your store POS system and on line sales
-
CAS reports for sales and inventory to analyze
-
Able to embed cart in your existing web site
-
Lower implementation costs
-
Lower on going license and maintenance fees
2) You have an existing eCommerce cart you want to integrate - we can make our API's available to your development team for integration
Advantages:
-
If currently using cart, there's no need to change
Set up Account (or add to existing retailcloud account)
-
If you are new to retailcloud, establish an account with retailcloud at https://retailcloud.com
-
Notify retailcloud at support@retailcloud.com that you would like an integrated eCommerce site
-
There will be monthly license fees associated with this account (need to set up monthly billing)
-
Determine if you would like to use retailcloud's assistance in setting up the integration (fees associated with this)
-
The following steps are what it takes to set up the eCommerce integration on retailcloud

Assumptions : Catalog is loaded (products, images, classifications are set up on CAS)
Action : Login to CAS and click on Configuration --> Integrations --> Ecwid Login.

Action - Enter the credentials as provided by retailcloud
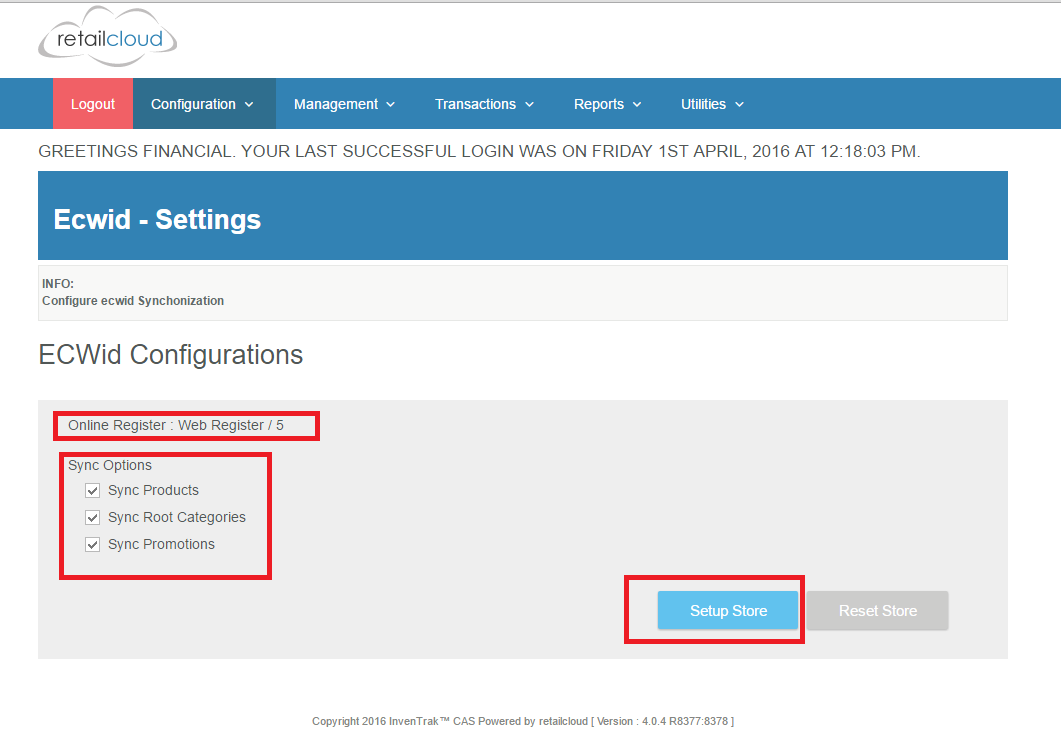
Action : Fill the Inventory/retailcloud configurations
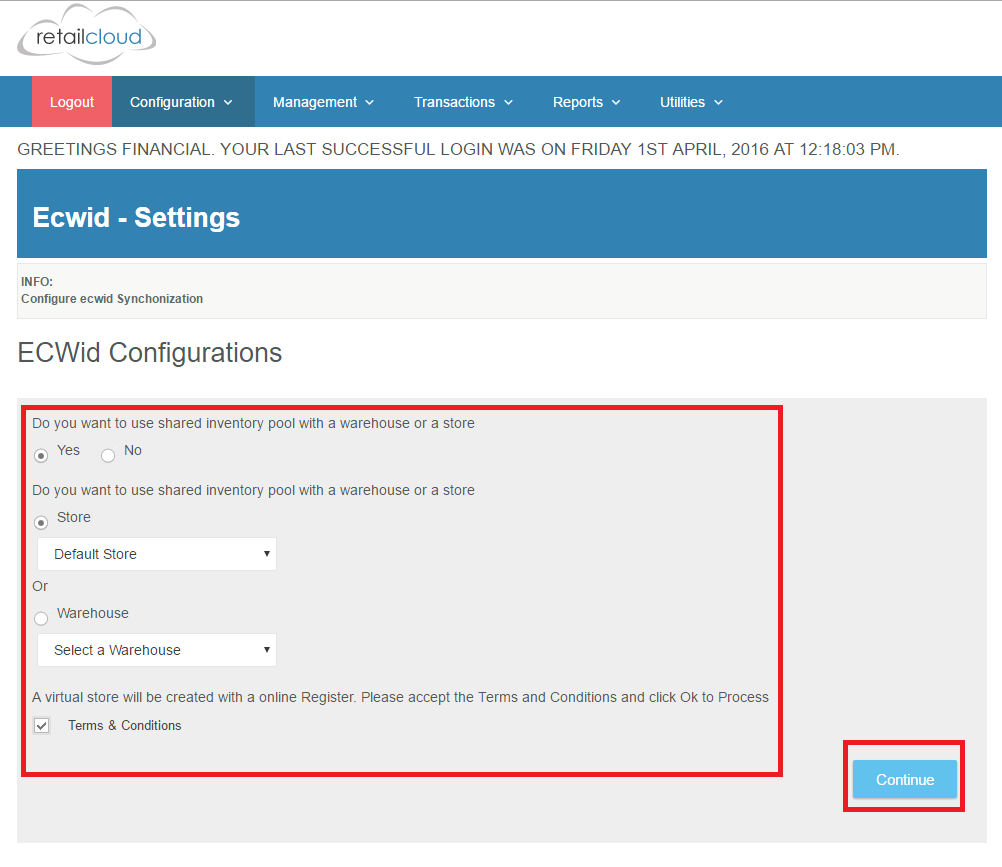
Assumptions : Product, Category and Discounts are preloaded
Action : Choose all the options and click Setup
Error: Register id shows null instead of a register number.
Reason : No valid license
Error: Sync Failed
Reason : Wrong deployment, Configurations or retailcloud API issue. Check with deployment team and App engine configuration
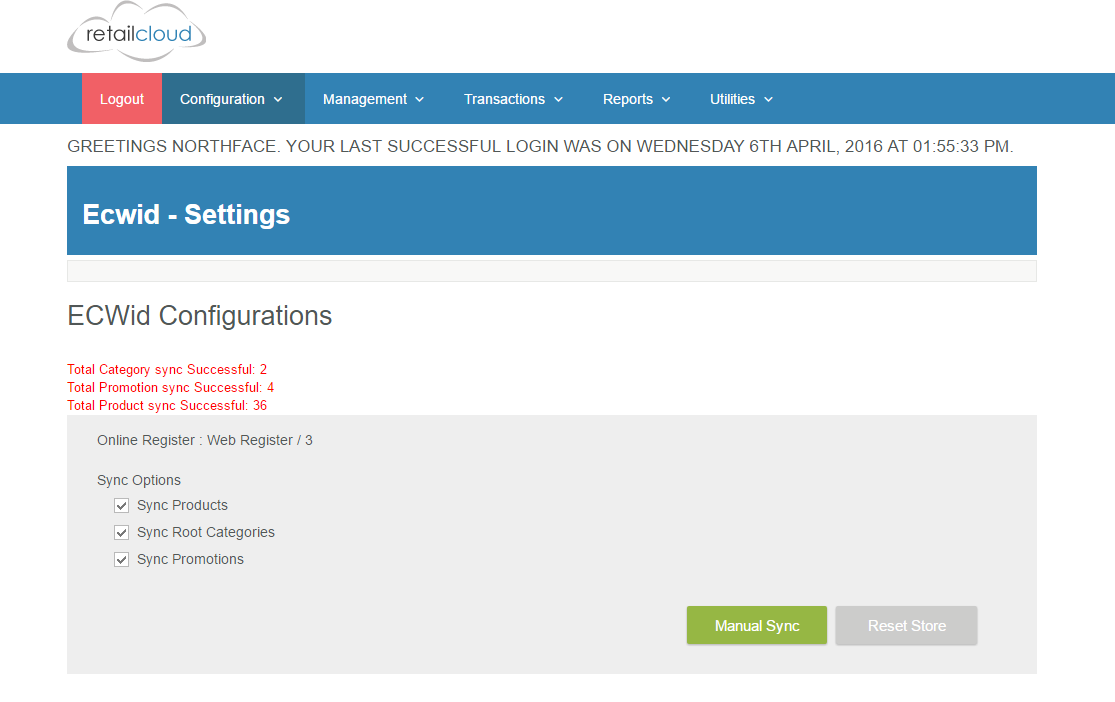
Assumptions : Success from previous step
Action : Validate the data in Ecwid. See if everything is synced (Products, Promotions, Category)


Mailchimp
Go to Configuration --> Integration --> Mailchimp
This is the set up to allow for your Mailchimp account to be integrated with retailcloud and allowing you to easily send well designed promotional campaigns to your customers. Your existing database of customers is used and you can select to email a discount or coupon using one of the templates provided. It's quick and easy to effectively reach your customers and make them aware of a special offer you have.

Best Practice
Track your promo campaign to see how much business it generated, as well as monitor your profit margin on the sales. This is best accomplished by using an unique discount code of the promotion so you will be able to follow the effect of the promo on your CAS reports.
Go to realtimetotals.com (CAS) --> Configuration -->Integrations --> Mailchimp. If you have an Mailchimp account you can easy login by pressing the Login button and entering your Mailchimp username and password.

If you don't have a Mailchimp account there is no need to worry, select Sign Up and easily set up an account with Mailchimp to get started.
.webp?alt=media&token=b3a682ba-3faf-4d29-879a-6e0d2faeb532)
-
List - where you can store multiple customer lists with their names and email addresses
-
Template - create and save different templates to send now or later
-
Campaign - an email design that is sent right away and is not saved to be used again
-
Create unique Discount or Coupon
-
Go to realtimetotals.com --> Configuration --> Integrations --> Mailchimp
-
Either log in with existing account or signup
-
Create a customer list
-
You can add emails manually at Mailchimp.com or
-
Sync contacts from CAS to Mailchimp by 1st creating a list at Mailchimp.com
-
When Syncing contacts, select list to sync to
-
success message will appear at the top of the screen
-
-
-
Create Template - you can edit this template in Mailchimp
-
Create Campaign
-
Select which list you want to send this promo to
-
Name your campaign (Customers will see this)
-
Add a subject (Customers will see this)
-
Enter From name (Who customers see the campaign is from)
-
Enter From email (Email address for company sending the email)
-
Select template to send (Will show up in drop down)
-
Select your unique discount or coupon code (only active codes listed here)
-
Select to either send now or later
-
launch
-
-
Your campaign will now appear under "Campaigns" in Mailchimp
-
From Mailchimp, select campaign you just created, review it and select to schedule launch or send.
-
You can now track your promo campaign in your CAS reports
-
You can also track who opened your email in Mailchimp "Reports"


Xero
Go to Configuration --> Integration --> Xero
We have integrated our application with Xero Accounting Software. Xero is an accounting software that stores all financial data in the cloud on a single unified ledger. Once setup all of your sales and refunds data can be transferred to Xero. The process is simple, set up the link with your Xero account, log into Xero and select which general ledger account you want your sales data to transfer to, and save. Your data will automatically be sent to the Xero Account daily.
If you have already established your accounting program with Xero, you login by pressing the Connect to button, and enter your Xero username and password.

Enter your Xero credentials to authorize retailcloud to send your information to Xero. Once completed you will be redirect back to CAS.

From CAS, select your Sales General Ledger and Return General Ledger that you want the sales and returns data to be sent to and press Save.
On a daily basis, sales and return data will be sent to your Xero Accounting account.
If you don't have a Xero account, there is no need to worry, we have a Sign Up for Xero button where you can access Xero and set up your account with Xero.

Xero Account - selecting general ledger from Chart of Accounts, the "Enable payments to this account" option must be enabled so Xero will allow data to be received into your account from retailcloud


Sign Up for Xero
If you don't have an account with Xero accounting, you can sign up on the Xero setting page, using the Signup for Xero button.
Enter the information needed to get credentials. You enter your First name, Last Name, Email Address, Phone Number, then you agree to the terms and conditions.
Once signed up with Xero, you will get an email to activate your account. It will take you to a page and you will create a password for your Xero account.
Once you entered the password you now have access to Xero.
When the Xero account is activated, go back into CAS - Marketing - Xero and press Connect to Xero.


Quick Books
Go to Configuration --> Integration --> Quick Books
Our integration with QuickBooks Online allows users to track their Sales - not only the Transactions, but COGS and Sales Tax as well. With QuickBooks Online and CAS, you will have Online Access anytime and anywhere. Setting Up is Fast and Easy, it only takes minutes to get started and the Data is automatically sent to QuickBooks Online on a daily basis.

This Integration is for QuickBooks Online accounting only
-
If you have already established your QuickBooks Online Account, you login by pressing the "Connect to QuickBooks" button, and enter in your QuickBooks Username and Password.
-
Authorize retailcloud to send your Sales Information to QuickBooks Online. Once completed - you will be redirected back to CAS.
-
From CAS, select the General Ledger that you want Sales and Return to be sent to and press "Save Accounts".
-
On a daily basis, sales and return data will be sent to your QuickBooks Online Account.

If you don't have a QuickBooks Online account, there is no need to worry, there is a Sign Up button where you can access QuickBooks Online and set up your account.

Once you no longer want to use this feature, simply go to CAS --> Configurations --> Integrations --> QuickBooks and press the disconnect from QuickBooks button.

Access :
Access is allowed for the System Admin role only
Articles in this section
- Central Administration System
- Configuration
- Company Details
- Company Information
- Payroll Settings
- Merchant Email Configuration
- Invoice Setup
- QSR
- Payment Settings
Comments
Please sign in to leave a comment.