Create Customers
Follow the steps below to create or view customer details. To create a new customer;
Click on Transactions → Customers → Create/View Customers.
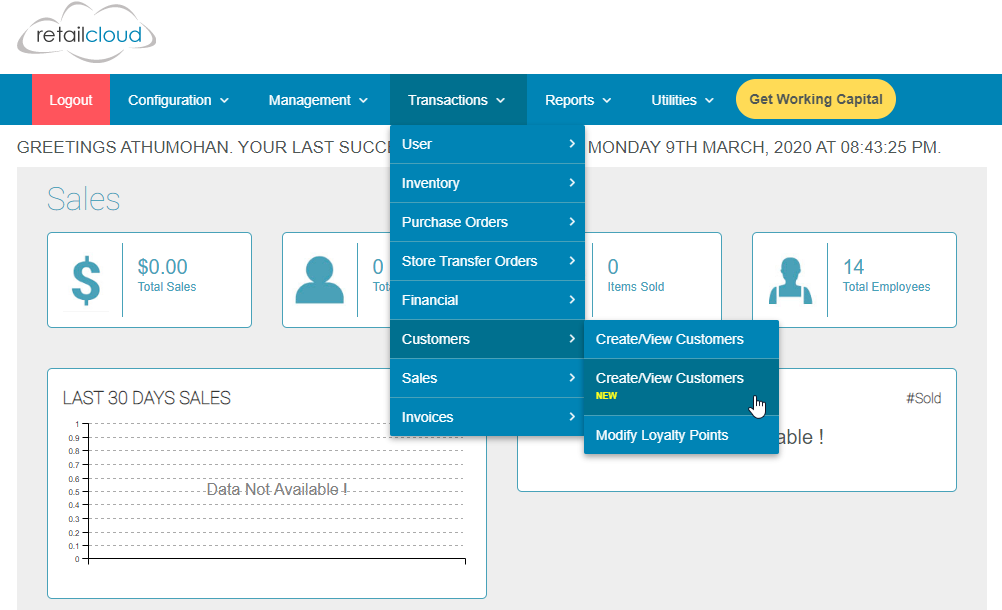
The customer's page appears with the list of already created customers. Users can search for customers by providing details in any of the search fields such as Customer Name, First Name, Last Name, Email, Address, Zip code, City, State, Country, Phone, Mobile, Groups.

To add a new customer
- Click on the “Add New Customer” tab.
- Enter the customer details on the provided fields.
- Click on ‘Additional Fields’ to add additional customer details.
- Select/Deselect the ‘Auto Generate Customer Number’ for automatically/ manually entering customer number.
- Click on “Add”.
- Customers will be added and displayed in the customer list.

Create Invoices
To create an Invoice follow the steps below:
- Go to Transactions → Invoices → Invoices
- Click on “+ Create Invoice” to create a new invoice.


Invoice Number : Enter the invoice number
Invoice Name : Enter the invoice name
Invoice Summary : Enter the invoice summary
Customer : Enter the Customer or select from the dropdown. The customer details will be auto-populated.
Invoice date : Enter the invoice date. (M)
Invoice Due date : Enter the invoice due date. (M)
Terms : Enter the terms. This field gets auto-populated with default values. (NM)

SKU : Select item from the dropdown. (M)
Description, Price & Quantity fields will be auto-populated and can be modified. Price & Quantity are mandatory.
Discount: Only a % discount is allowed on the invoice. (NM)
Tax: Choose the tax from the dropdown (NM)
- Click on ‘+ Add New Item’ to add more items.
- Select the Discount & Tax from the dropdown box.

Private Notes : Enter any private notes to be added. This section will not appear on the invoice.
Notes : Enter any private notes to be added. This section will auto-populate with default values.
Footer : Enter the footer to be added. This section will auto-populate with default values.
- Click ‘Save’.
- Select from any of the three options available :
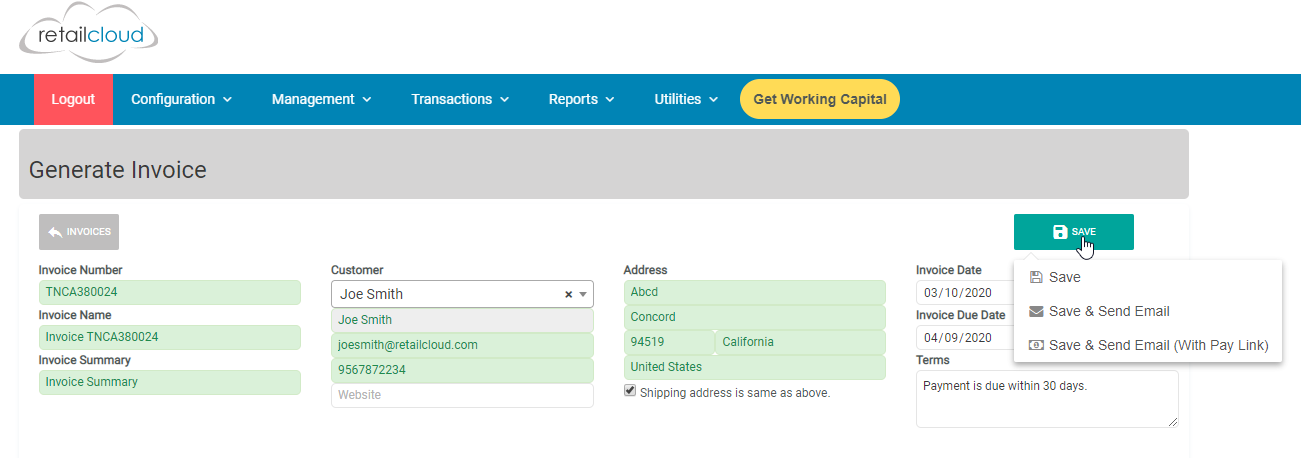
Save : Save the invoice
Save & Send Email : Save the invoice and send it to the customer's email id, (This option can be selected if you wish to send an invoice without email)
Save & Send Email (With Pay Link) : Save the invoice and send it with the payment link to the customer's email id

- Click on “View Invoice” to view the invoice you created.
- Click on “Download” to download the invoice as a pdf file.
- Click on “Show Invoices” to view the invoice list.
Click on “Create New” to create a new Invoice.
Note: Each invoice will be recorded as a pos transaction if the invoice is not generated from existing store credit transactions. Invoice payments will be shown on the reports as a pos transaction.
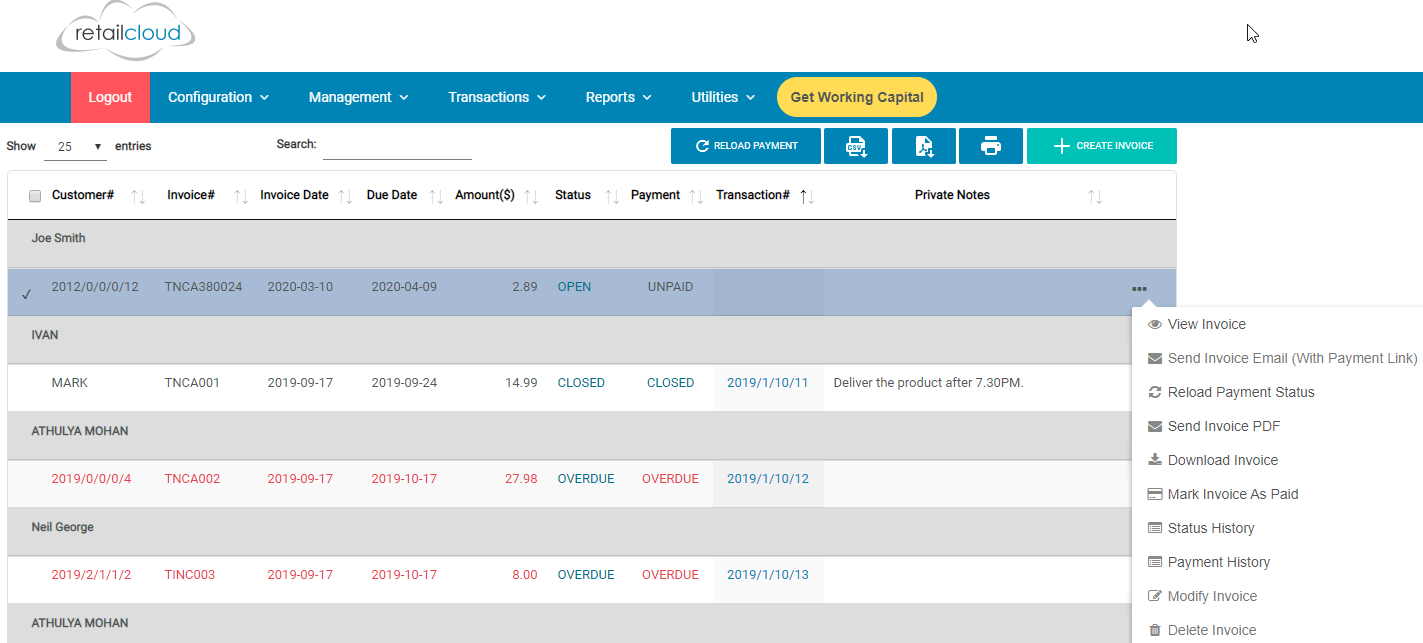
Search for a particular invoice by Customer/Invoice/Status from the Invoice List. Click on the 3 dots provided to select the options from:
- View Invoice: View the invoice (Invoices with multiple pages can be viewed by clicking on the 'Next' button)
- Send Invoice Email (With Payment Link): Send an email invoice to the customers with payment link, allowing them to make payments on a single click.
- Reload Payment Status: Refreshes the page and reload the statuses of the payments done online with a single click.
- Send Invoice PDF: Send an email invoice to customers as PDF files. (Without payment link)
- Download Invoice: Allows you to download the invoice.
- Mark Invoice as Paid: Change the invoice status as 'Paid'.
- Status History: View the invoice status history.
- Payment History: View the payment history.
- Modify Invoice: Allows to modify the invoices which are saved as a draft. (Open invoices cannot be modified)
- Delete Invoice: Allows to delete the invoice.
Note :
Invoice Email with payment link can only be sent once to the customer whereas Invoice PDF without payment link can be sent multiple times.

Status History
To view transaction generated from Invoice, click on the transaction number to view the receipt

Create Invoices for Store Credits
Note: Generating invoices from store credit will not create another transaction so that the inventory will not get reduced.
To create an Invoice for store credit, follow the steps below:
- Go to Transactions → Invoices → Invoices
- Click on “+ Create Invoice” to create a new invoice.
- Enter the invoice details in the fields provided.
- Select 'Store Credit' by clicking on the 'Manual Entry' button, which will list the store credit transactions.
- Choose the store credit transaction from the list to generate the invoice.
- Click 'Save'.
- Select from any of the three options available: Save: Save the invoice as a draft.
Save & Send Email: Save the invoice and send it to the customer's email id. (This option can be selected if you wish to send an invoice without payment link)
Save & Send Email (With Pay Link): Save the invoice and send it with the payment link to the customer's email id. - Click on “View Invoice” to view the invoice you created. Store Credit details will be displayed on the invoice PDF.
Click here to know how to set up Store Credit Limit


Invoice PDF with Store Credit details
House Accounts associated with an Invoice
To view the house account associated with the invoice, select the invoice and click on 'House Accounts' (transaction#). For house account invoices Transaction number will be displayed as House Account or Click on the three dots and select 'View House Accounts'.


Sample Invoice

Comments
Please sign in to leave a comment.