With Console, create assembly PO with Purchase order.
You can create orders for multiple suppliers simultaneously instead of entering a separate order for each supplier. You specify the items you want to purchase and the supplier from whom you want to purchase each item on the Purchase Order.
Applicable business scenarios for Decoration PO:
For a merchant trying to purchase a box from Vendor 1, have vendor 1 ship the box to Vendor 2 and then have vendor 2 add some additional components and then ship the finished material to the merchant.
Enable Decoration PO
Login to Console --> Inventory--> Purchase Orders → Create PO
The screen must be completed with the necessary information to allow the vendor to fill your order.
Main PO Details
- PO Name: The user has the option of using the auto-generated name or creating their own name for the PO by unchecking the box and manually entering the name.
- PO Number: The user has the option of using the auto-generated number or creating their own number for the PO by unchecking the box and manually entering the number.
Main PO Vendor Details
-
Select a Vendor by entering the Vendor details in either of the following fields; Vendor Code, Vendor Name, or License No. All the other vendor details will get auto-populated if they are saved in the system already. (If vendor email is given, the PO is finally emailed to the vendor. Additional emails can also be added on the Email field)
For adding a new vendor click the Vendor Name dropdown and hit Add New button, this will take the user to the Add Vendor screen where the vendor details can be given and saved.
- Select the date applicable or the current date will be set by default.
Main PO Location Details
- The user places the order for the selected Venue and the Store/Warehouse.
-
Billing Address: This will be auto-populated (Company Address)
-
Shipping Address: This will be auto-populated (Decoration PO vendor Address)
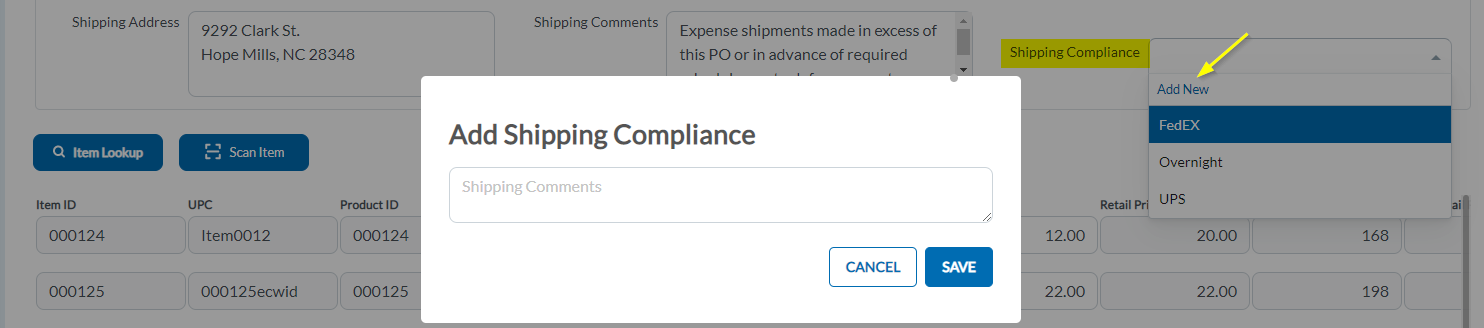
- Give Shipping Comments if applicable.
- Shipping Compliance: From the drop-down select the shipping compliance(previously created will be available in the drop-down for selection).To add a new Shipping Compliance, click on to the down arrow -->Add New--> Enter the details (uses such as UPS, 2 Day, Overnight, etc) and click Save.
Once the Main PO Vendor Details and Location Details are entered, check the Enable Decoration PO box to enable Decoration PO, if checked a new section for the Decoration PO will be added to the screen and additional Decoration PO(sub PO) details need to be entered here.
Decoration PO Details
Select a Vendor by entering the Vendor details in either of the following fields; Vendor Code, Vendor Name, or License No. All the other vendor details will get auto-populated if they are saved in the system already
Billing Address: This will be auto-populated (company address)
Shipping Address: This will be auto-populated (Location/Store address of Main PO)
Enter Shipping Comments if applicable.
Shipping Compliance: From the drop-down select the shipping compliance(previously created will be available in the drop-down for selection).
Item Lookup
-
Select the item using the Item Lookup button.
- All the items that the user wants to add to the PO can be checked and added.
- The Cost Price can be adjusted for this order to a different amount, but the selling price and item description cannot be modified.
- Decoration Charge Per Item can be added to the respective item and the Total Decoration Charge will be automatically calculated.
- Deliver By date can be added for each line item.
-
Each item had Comments which is a place where line item notes can be added, this can be viewed by the user later at the Console only and is not visible in the PDF copy of the PO. These notes can be modified by the user and once the PO is sent, the notes cannot be modified and can only be viewed. Comments are added by clicking on the
 button near each line item.
-
Items can be removed by clicking on
the button near each line item.
-
Click Create and the user is returned to the PO Modify screen and can proceed. At this point, the user would review the PO, make any modifications and then Send for Approval. The Purchase Order is then approved, and finally sent or marked to send.
Create PO → Send For Approval → Approve → Send To Vendor → Closed
Download a Decoration Purchase Order
To Download a previously created Decoration PO, select the PO from the list and click on the PO Number to go to the PO Summary page. (PO can be downloaded from the Creation/Edit page as well)
Click on the Download (pdf symbol) button.
Select Decoration PO. The receipt pdf will automatically get downloaded.
Sample PO Receipt:
Sending Email To Vendor
To Send Email to Vendor, select the PO from the list and click on the PO Number to go to the PO Summary page. (PO can be sent from the Creation/Edit page as well)
Click on the button.
Select Decoration PO. A popup confirmation message will appear, click Yes to continue.
Articles in this section
- Item Import Field Descriptions
- Overview
- Merchant Onboarding
- Navigation Bar
- Reports
- Items
- Settings
- Dashboard Overview
- Company
- Register
Comments
Please sign in to leave a comment.