Navigate to Catalog→ Items
This is where you can create new inventory items. All the items created will be listed here with the ItemID, UPC, Name, Department, Category, Price, etc, and an option to modify/delete. For instructions on how to create a new item, follow the steps below.
Adding New Item
Go to Catalog→ items
Click Add New Item button at the top of the Item list on the right side of your screen.
Type in the text box to add the ItemID, UPC, Name, Description, and Price of the new Item. Fill in the general information needed for this item, If an item does not require any information in one of these fields, that field can be left blank.
You can input as much detail as you are comfortable with using. You can always come back and make modifications in the future once you determine your needs (you have a Mass Modify option).
Product Details
You can have the Console Auto-Generate the Item ID which can be done by clicking the auto-generate box.
ItemID: this can be scanned in from the item. If you do not have an existing UPC you can create your own by entering the numbers you want to use (you can create barcode labels using these UPC's that you create on the system). Do not use spaces or special characters (Max # of characters is 15). This needs to be a unique number for this item. This is a mandatory field.
UPC: A UPC number is typically 12 digits, but the system allows for "SKU's" or non-standard UPC's to be entered in the UPC field (12 digits are no longer required - but 12 digits are recommended, so that the number corresponds to the UPC used by the vendors)
If you try to create an item with an existing item id an error message will be generated. It is not advisable to use duplicate item id numbers or duplicate UPC's, as it affects the ability of these items to appear on various reports or functions.
We recommend using a unique item ID and UPC for each item.
Cost Price for the item, the cost price is automatically adjusted when merchandise is received and a new price is indicated. It uses a weighted approach to adjust the cost price. This is a mandatory field.
Selling Price of the item. You can also create an item with a variable price item, where the cashier is prompted for the sales price at the sales transaction screen. This is a mandatory field.
Name: This is the name of the item. Keep it as short as you are comfortable. (Max # of characters is 50). Each item must have its own Name. This will show up in all reports where the Item/UPC name is displayed as well as on all POS receipts. This is also a field that cashiers can search for at the POS. Item Name is a mandatory field.
E-Commerce Name: This is the eCommerce name for the item. Enter a name as you would like shown on the e-commerce site. Check the Enable E-Commerce box if you want the item to be available on your e-commerce site.
Enhanced Description: This field is for entering in additional information to an item to be used on an e-commerce site and also can be printed on bar code labels to enhance the description.
Meta Data: Enter metadata tags for the item.
Attributes & Classifications
Select the Classifications (Department, Category, Subcategory) from the drop-down menu. These are all non-mandatory fields and if the selection is not available in the drop-down, a new option can be created from Catalog → Attributes. This is a mandatory field.
Select the Attribute (Style, Color, Size, Brand, Season) from the drop-down menu. These are all non-mandatory fields and if the selection is not available in the drop-down, a new option can be created from Catalog → Attributes.
Select the Vendor from the drop-down menu. If the vendor does not exist a vendor record can be created from Catalog → Vendor. The field can be left blank and the vendor will be assigned to the "Unassigned" vendor.
Vendor Alias is used to add another descriptor on an item. The descriptor is shown on the Purchase Order. If Vendor has a different vendor ID for items, this allows the Vendor ID to be a part of the Purchase Order so that the Vendor can identify the items.
Royalty Level - This field not in use at this time
Product ID: eCommerce ProductID of the item
Product Name: Product name of the item
Type: Select the Item Type from the drop-down menu. Items can be classified into Prepaid Items, Store Items, Package Items or Service Items, and Modifier Items.
Product Code
Discount: Select a Discount Code from the drop-down menu. This will add the discount to all POS sales transactions of this item between the start date and end date. When a Discount code is expired the discount code is not displayed in the drop-down selection. Only current discounts appear.
When creating a new item or modifying an item you can select the item from not being able to get a Item Level discount by checking the No Discount Box
Tax Code: Select a Tax Code from the drop-down menu, This will be the tax that will be applied to all sales on the item. If a tax code is not selected (left at Null), no tax code will be applied to the transactions. If the Selling Price that is displayed includes tax, then select the Tax Inclusive flag. Sales on the item will be displayed at the POS less the appropriate tax. This is usually used when the objective is to keep the price including tax at a round number, typically to eliminate the need for change. Note that if the sale on a tax-inclusive item is tax-exempt the item price will be the same as the tax-inclusive price to the customer (Example $40 item that's tax inclusive at 10% tax, Price is $36.36 plus $3.64 tax, $40. $40 item that is tax inclusive and tax-exempt. Price is $40 (no tax)).
Additional Info
SKU Type: Set an item's SKU type when using a scale or reading barcodes with embedded information. the SKU types are Force Quantity, Force Weighing, Embedded Price, Embedded Quantity.
Fees: Set items to have a fee attached so that each time the item is added to the cart, the assigned fee will automatically be added.
Reorder Settings
Minimum and Maximum Levels: This is used when reorder levels are set for the individual items. When the minimum level is reached, the maximum level is ordered.
Product Image Gallery
This allows you to add an image to your items and their variants.
How to Import Items through Console?
Navigate to Utilities → Import
Importing your products is the most efficient way to Add or Update your product catalog. Whether you're adding new products or making changes to existing ones, importing is the best way to make those changes in bulk.
It's as simple as drag and drop of your item file.
Great for converting from your current POS system, as we accept any file.
The Import will assess your file, ask the meaning of any column headers it does not recognize.
An email will be sent to you with the import status, how many items successfully import, how many fail with the reason for the fails.
Getting Started
You'll need access to a spreadsheet program that supports CSV files such as Excel or Google Sheets. Any other file type will not import.
Choosing an Import Template
You can download the sample template by clicking on the Download Sample link.
You can also create your custom import templates, and select only the product fields you want to include.
Select the required titles and download the CSV file.
These are just a few examples of the requirements you'll need to be aware of before importing. If you have any issues, see Troubleshooting | Data Import for help with several common scenarios that can occur.
Now, when you are ready with the import file, process with the steps below.
Importing Products
- Go to Utilities → Products → Click on Item Import
- Upload Your File: Attach the Item file by simply Drag & Drop or upload your CSV file directly from your computer by browsing for it.
- Click Continue when done.
- Column Mapping: Once the file is loaded the column headers from the file will be displayed below the heading Column Name. In the case of the column header from the file exactly matching the Console field name this will be automatically mapped and this is displayed in the Map to Field.
- You can map and make sure all of the column fields data you're importing has been matched to its equivalent setting on Console.
- Enter the email address to which you will receive the status of your import.
- Click Continue.
- Import will be Initiated → Click Finish.
- You will be taken back to the Import page, where at the bottom you can see a section 'Recent Imports' which will show the details and current status of the imported file.
- Click on the Status (highlighted in blue color) to view the Status Report- This will list both Imported Records as well as Failed Records with a reason for the failure. You also have the option to Download the Failed Records by clicking on the Download button. You can correct the remaining failed record and precede to reimport them.
- Once done you can see the Status as COMPLETED
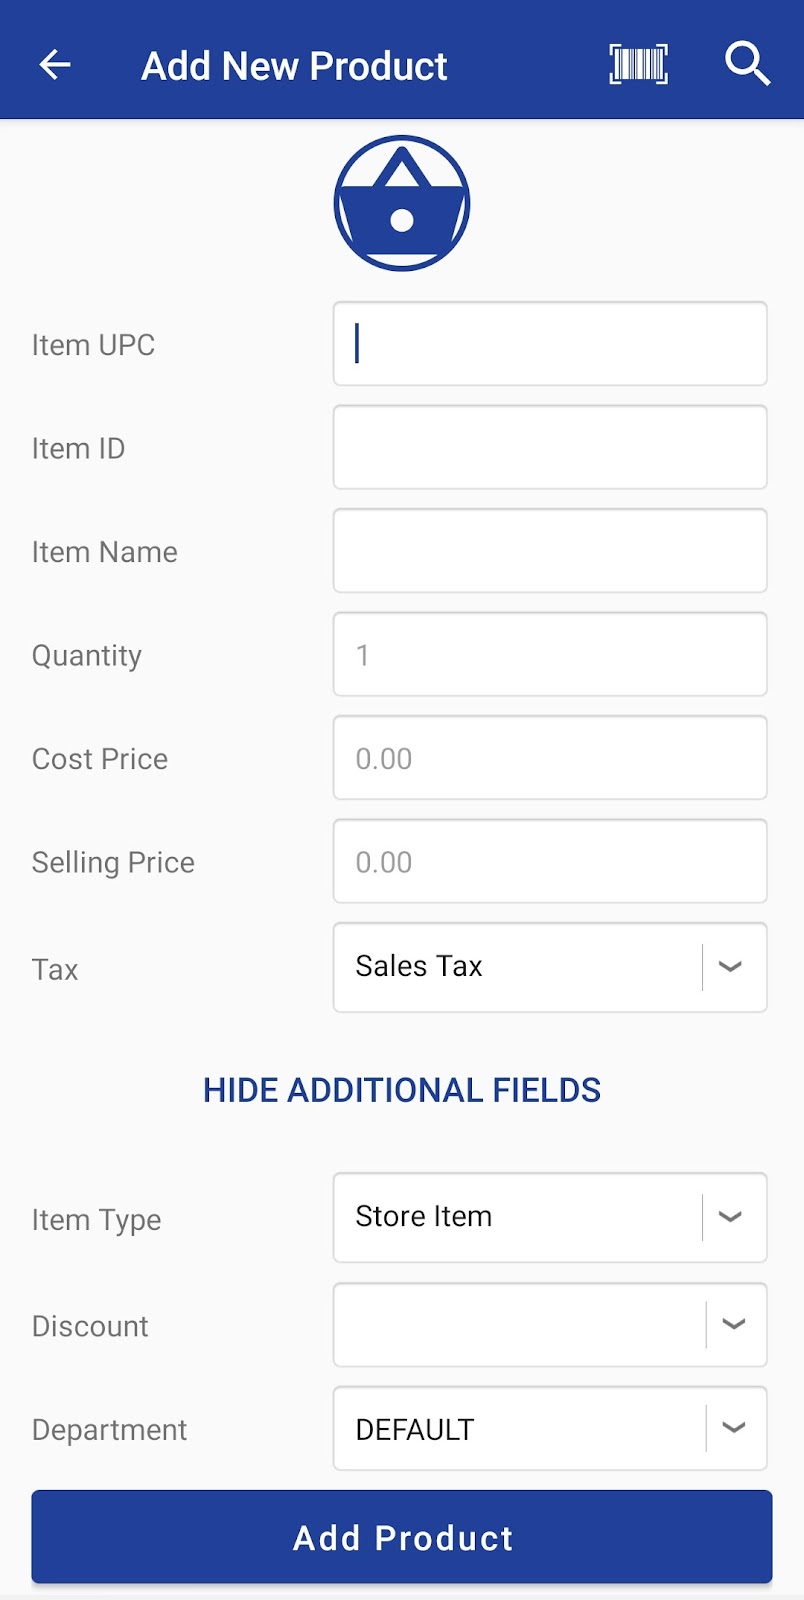
How to create Items through 6IX POS?
To start adding items - press the 'sales basket' in the lower right
Adding New Products -Scan
Press the Scan Icon located on the top bar. This will activate the camera to scan a barcode and you can enter item information, including opening quantity
Adding New Products - Manually
For items without a scannable barcode, just start populating the item information and when completed press Add Product
To view and create products, click on the menu icon from the home screen, Master Data → select ‘Products’. The product list will be displayed.
Adding a new Item
-
To add a new item, click on the ‘sales basket sign’ at the bottom of the screen.
-
Enter the item details in the field provided.
-
Click ‘Add Product’.

Articles in this section
- Happy Path for Agents Training Merchants
- How to log into the Console?
- How to access Company settings on Console/6IX POS
- How to access the Register settings on Console
- How to customize the Receipt settings on Console/6IX POS
- How to create QuickPick on Console/6IX POS
- How to configure Tax Settings on Console
- How to manage Users on Console/6IX POS
- How to create Items on Console/6IX POS
- How to Import Items through Console?
Comments
Please sign in to leave a comment.